Listen up, folks! If you've been pulling your hair out because your Raspberry Pi VNC is not working after setting it up behind a firewall, you're in the right place. This guide is here to save your sanity and get things back on track. We all know how frustrating tech issues can be, especially when you're just trying to remote into your Pi. But don’t sweat it—by the end of this article, you'll have everything sorted out and running like a champ.
Now, let's be honest here. Setting up VNC on a Raspberry Pi behind a firewall isn’t exactly a walk in the park. There are a bunch of moving parts to consider, from port forwarding to firewall rules and even network configurations. But fear not, because I’m going to break it all down for you step by step. Whether you're a seasoned pro or a complete noob, this guide will help you troubleshoot and resolve any issues you might be facing.
So, if you're ready to dive deep into the world of Raspberry Pi VNC setups and firewall configurations, let's get started. Trust me, once you nail this, you'll feel like a certified networking wizard. Let's roll!
Read also:Who Is Jon Cor Married To Discovering The Life And Love Of Jon Cor
Table of Contents:
- Introduction
- Understanding Raspberry Pi VNC
- Firewall Basics
- Common Issues with VNC Behind Firewall
- Step-by-Step Setup Guide
- Troubleshooting Tips
- Securing Your VNC Connection
- Alternatives to VNC
- Best Practices
- Conclusion
Understanding Raspberry Pi VNC
First things first, let's talk about what VNC actually is and why it's such a game-changer for Raspberry Pi users. VNC, or Virtual Network Computing, is a system that allows you to remotely control another computer over a network. For Raspberry Pi users, this means you can access your Pi from anywhere in the world, as long as you have an internet connection.
Why does VNC matter? Well, imagine being able to control your Pi without needing to physically sit in front of it. Whether you're managing a home automation system or running a server, VNC gives you the flexibility to do everything remotely. But when things go south, like when VNC stops working after being set up behind a firewall, it can feel like the end of the world.
Now, let's dive into the nitty-gritty of how VNC works and why it might not be working for you. Stick with me here—it's gonna get interesting.
How VNC Works on Raspberry Pi
Here's the deal: VNC works by sending screen updates from the host computer (in this case, your Raspberry Pi) to the client (your computer or mobile device). This allows you to see everything happening on your Pi’s desktop, even if you're miles away. But to make this magic happen, a few things need to align perfectly.
First, your Pi needs to be running a VNC server. Then, your client device needs to connect to that server using the right IP address and port number. Easy peasy, right? Well, not exactly. When you throw a firewall into the mix, things can get a little tricky.
Read also:Myron Woodson The Rising Star You Need To Know About
Firewall Basics
Before we dive deeper into why your Raspberry Pi VNC might not be working after setting it up behind a firewall, let's quickly cover what a firewall actually is. A firewall is like a security guard for your network. It monitors incoming and outgoing traffic and blocks anything that looks suspicious. While firewalls are awesome at keeping bad stuff out, they can also accidentally block legit connections—like your VNC session.
What happens when VNC meets a firewall? Well, if your firewall isn't configured properly, it might block the VNC connection, leaving you stranded and unable to access your Pi. That's why understanding your firewall settings is crucial if you want to get VNC up and running smoothly.
Types of Firewalls
There are different types of firewalls you might encounter, including hardware firewalls (like the one in your router) and software firewalls (like the one built into your Pi's operating system). Each type has its own set of rules and configurations, so you'll need to know which one you're dealing with before you can troubleshoot effectively.
Common Issues with VNC Behind Firewall
Alright, let's talk about some of the most common issues people face when trying to use VNC behind a firewall. These problems can range from simple misconfigurations to more complex networking issues. Don't worry, though—I've got solutions for all of them.
Issue 1: Port Forwarding Not Configured
One of the biggest culprits is port forwarding. If your router isn't set up to forward the right ports to your Pi, your VNC connection won't work. By default, VNC uses port 5900, so you'll need to make sure that port is open and forwarded correctly.
Issue 2: Firewall Blocking VNC Traffic
As we mentioned earlier, firewalls can sometimes block legit connections. If your firewall is too restrictive, it might be stopping VNC traffic from reaching your Pi. You'll need to adjust your firewall rules to allow VNC connections.
Issue 3: Incorrect IP Address or Port Number
Another common issue is entering the wrong IP address or port number when trying to connect to your Pi. Double-check that you're using the correct external IP address and port number when setting up your VNC client.
Other Potential Issues
There are a few other things that could be causing your VNC connection to fail, such as outdated software, network congestion, or even DNS issues. We'll cover all of these in more detail later on, but for now, just know that they're on the table as potential problems.
Step-by-Step Setup Guide
Now that we've covered the basics, let's walk through a step-by-step guide to setting up VNC on your Raspberry Pi behind a firewall. Follow these instructions carefully, and you'll be good to go in no time.
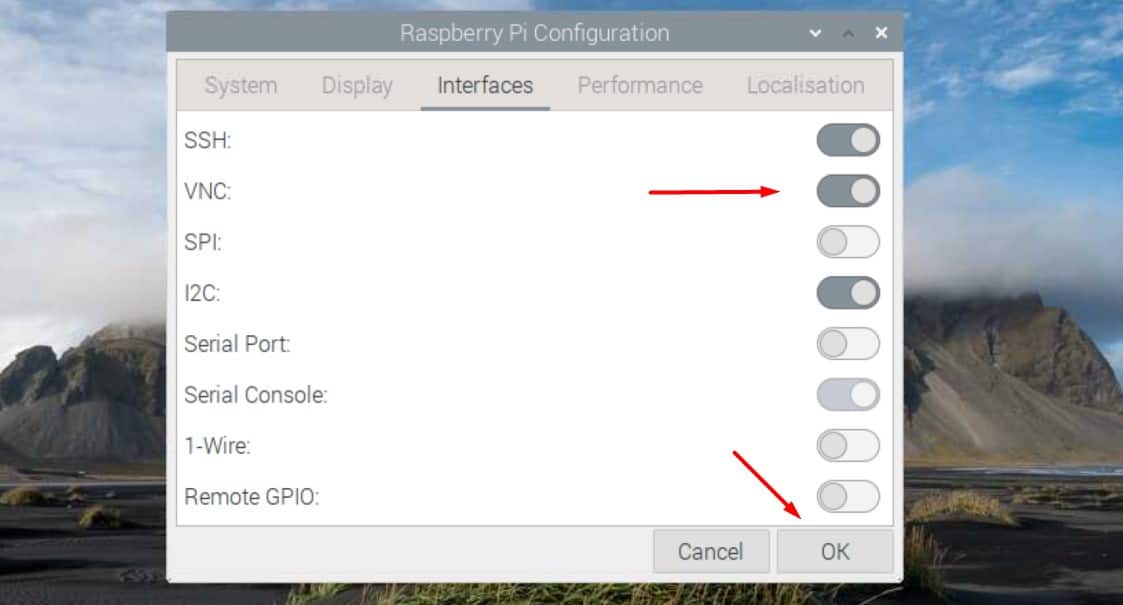
Step 1: Install VNC Server on Your Pi
First, you'll need to install a VNC server on your Raspberry Pi. You can do this by running the following command in the terminal:
sudo apt install realvnc-vnc-server
Once the installation is complete, start the VNC server by running:
vncserver
Step 2: Configure Port Forwarding on Your Router
Next, log in to your router's admin panel and set up port forwarding for port 5900. Make sure to forward this port to your Pi's local IP address. You can find your Pi's IP address by running:
hostname -I
Step 3: Adjust Firewall Settings
Finally, adjust your firewall settings to allow VNC traffic. If you're using a hardware firewall, consult your router's manual for instructions. If you're using a software firewall, you can usually adjust settings through your Pi's GUI or terminal.
Troubleshooting Tips
Even if you follow the setup guide to the letter, you might still run into issues. That's where troubleshooting comes in. Here are a few tips to help you diagnose and fix common problems.
- Check your router's port forwarding settings to ensure they're correct.
- Verify that your firewall isn't blocking VNC traffic.
- Double-check the IP address and port number you're using in your VNC client.
- Try restarting your Pi and router to see if that resolves the issue.
Advanced Troubleshooting
If basic troubleshooting doesn't work, you might need to dig a little deeper. Check your router's logs for any errors related to VNC traffic. You can also try using tools like netstat or nmap to scan your network and identify any issues.
Securing Your VNC Connection
Security is always a top priority when dealing with remote connections. Here are a few tips to help you secure your VNC connection:
- Use strong passwords for your VNC server.
- Enable encryption to protect your data during transmission.
- Limit access to your VNC server by using IP whitelisting.
Best Security Practices
In addition to the tips above, consider using a VPN to further secure your VNC connection. This will encrypt all traffic between your client and server, making it much harder for hackers to intercept your data.
Alternatives to VNC
If VNC just isn't working for you, there are a few alternatives you can try. Some popular options include:
- SSH: A secure way to access your Pi's terminal remotely.
- TeamViewer: A user-friendly remote desktop solution.
- NoMachine: A fast and efficient remote access tool.
Why Choose an Alternative?
Sometimes, switching to an alternative solution can save you a lot of headaches. If VNC is too finicky or unreliable for your needs, one of these options might be a better fit. Plus, many of them offer additional features that VNC doesn't, such as file transfer and chat functionality.
Best Practices
To wrap things up, here are a few best practices to keep in mind when working with VNC on your Raspberry Pi:
- Always keep your software up to date.
- Regularly back up your Pi's data.
- Monitor your network for any suspicious activity.
Final Thoughts
By following these best practices, you'll be well on your way to becoming a Raspberry Pi VNC expert. Remember, troubleshooting can be a bit of a rollercoaster, but with patience and persistence, you'll get everything working like a charm.
Conclusion
Well, there you have it—everything you need to know about Raspberry Pi VNC behind a firewall. From understanding how VNC works to troubleshooting common issues and securing your connection, this guide has got you covered. So, whether you're just starting out or you're a seasoned pro, I hope this article has been helpful.
Now, here's the deal: if you found this article useful, don't forget to share it with your friends and fellow Raspberry Pi enthusiasts. And if you have any questions or comments, feel free to drop them below. Happy tinkering, and see you in the next one!