Are you tired of squinting at a cracked or flickering laptop screen? Trust me, I’ve been there. A damaged laptop screen can turn your productivity into chaos. But don’t panic—replacing it isn’t as scary as it seems. The first step? Figuring out exactly what kind of screen you need. In this guide, we’ll break down how to identify your laptop screen for replacement, so you can get back to work, gaming, or binge-watching Netflix in no time.
Before we dive into the nitty-gritty, let’s address the elephant in the room: identifying your laptop screen isn’t rocket science, but it does require some detective work. Whether your screen is cracked, has dead pixels, or just looks like it’s been through a war, knowing the right model and specifications will save you both time and money. So, grab a coffee, and let’s get started.
This guide is packed with tips, tricks, and real-world advice to help you navigate the world of laptop screen replacements. We’ll cover everything from decoding your laptop’s make and model to understanding the technical jargon. By the end of this article, you’ll feel like a tech wizard ready to tackle any screen replacement challenge.
Read also:Unveiling The Truth About Telegram Incest What You Need To Know
Why Identifying Your Laptop Screen Matters
Imagine walking into a repair shop or browsing online for a replacement screen, only to find yourself overwhelmed by options. It’s easy to get lost in the maze of part numbers, resolutions, and sizes. That’s why identifying your laptop screen correctly is crucial. The wrong screen won’t just waste your money—it could damage your laptop further. Let’s explore why this process matters and how it impacts your repair journey.
Preventing Costly Mistakes
Replacing a laptop screen isn’t cheap. On average, you could spend anywhere from $50 to $300 depending on the brand and model. If you order the wrong screen, not only will you have to return it (if you’re lucky), but you might also face shipping fees and delays. Identifying your laptop screen accurately ensures you get the right part the first time around, saving you both cash and headaches.
Ensuring Compatibility
Not all laptop screens are created equal. Some are LED-backlit, while others use older CCFL technology. Some have matte finishes, while others are glossy. And let’s not forget about resolution—full HD, 4K, or even ultra-wide formats. Without knowing your laptop’s specific requirements, you risk buying a screen that doesn’t fit or function properly.
Step-by-Step Guide to Identify Your Laptop Screen
Now that we’ve established why identifying your laptop screen is important, let’s walk through the steps to do it right. This isn’t just about finding the right size or brand; it’s about understanding the nuances of your laptop’s display technology. Here’s how you can approach it:
1. Find Your Laptop’s Make and Model
This is step zero, folks. Every laptop has a unique make and model number that serves as its identity. You can usually find this information on a sticker somewhere on the device, often on the bottom or near the hinge. For example, if you own a Dell Inspiron, the model might look something like “Inspiron 15 3000.” Jot it down—it’ll come in handy later.
2. Check the Screen Size
Laptop screens come in various sizes, typically ranging from 11 inches to 17 inches. To measure your screen, use a ruler or tape measure to determine the diagonal distance from one corner to the opposite corner. Most laptops will also list the screen size in their specifications, so double-check your manual or the manufacturer’s website if you’re unsure.
Read also:Tyrus A Comprehensive Guide To The Rising Star In The Entertainment World
3. Determine the Resolution
Resolution matters because it affects image quality and clarity. Common resolutions include 1366x768 (HD), 1920x1080 (Full HD), and 3840x2160 (4K). If you’re unsure, check your laptop’s settings or search for its specs online. A higher resolution means sharper images, but it also requires more processing power.
4. Investigate the Backlight Type
Modern laptops typically use LED-backlit screens, which are energy-efficient and produce brighter images. Older models might still use CCFL backlighting, which is bulkier and less efficient. If you’re unsure which type your laptop uses, consult the manual or search for the screen part number online.
5. Consider Additional Features
Some laptops come with special features like touchscreens, anti-glare coatings, or high refresh rates. These details can impact compatibility, so make sure you account for them when shopping for a replacement screen. For example, a touchscreen laptop won’t work with a non-touchscreen replacement and vice versa.
Common Challenges in Identifying Laptop Screens
Even with the best intentions, identifying your laptop screen can be tricky. Below are some common challenges you might encounter and how to overcome them.
Missing Stickers or Labels
What if your laptop doesn’t have a visible make or model number? Don’t panic. You can usually find this information in your laptop’s BIOS settings. Restart your computer and press the appropriate key (usually F2, F10, or Del) during startup to access the BIOS menu. Look for the system information section, where you’ll find details about your laptop’s hardware.
Confusing Part Numbers
Screen part numbers can be cryptic, but they’re essential for ordering the correct replacement. These numbers often include details about the screen’s size, resolution, and backlight type. If you’re unsure how to decode them, search online for a part number guide specific to your laptop brand. Many manufacturers provide detailed breakdowns of their part numbering systems.
Compatibility Issues
Not all replacement screens are universal. Some brands use proprietary connectors or mounting brackets, making it impossible to swap screens between different models. Always verify that the replacement screen you’re considering is compatible with your laptop’s make and model.
Where to Find Reliable Replacement Screens
Once you’ve identified your laptop screen, it’s time to find a reliable source for replacement parts. Here are some options to consider:
Manufacturer Websites
Most major laptop manufacturers sell official replacement parts through their websites. While these screens can be pricier than third-party options, they come with the assurance of quality and compatibility. Plus, you’ll often get a warranty or return policy, which can be a lifesaver if something goes wrong.
Third-Party Suppliers
If you’re looking to save money, third-party suppliers can be a great option. Websites like eBay, AliExpress, and Amazon offer a wide range of replacement screens at competitive prices. Just be sure to read reviews carefully and choose sellers with high ratings and positive feedback.
Local Repair Shops
For those who prefer face-to-face interaction, local repair shops can be a valuable resource. Many shops stock replacement screens for popular laptop models and can even install them for you if you’re not comfortable doing it yourself. Plus, they can offer personalized advice based on your laptop’s specific needs.
DIY vs Professional Installation
Now that you’ve identified and sourced your replacement screen, it’s time to decide whether to install it yourself or leave it to the professionals. Here’s a breakdown of the pros and cons of each approach:
DIY Installation
- Pros: Saves money, gives you hands-on experience, and allows you to learn more about your laptop’s inner workings.
- Cons: Requires technical skills, carries a risk of damaging your laptop, and voids warranties in some cases.
Professional Installation
- Pros: Ensures a flawless installation, minimizes risk, and provides peace of mind.
- Cons: Can be expensive, especially for high-end laptops, and may involve waiting times.
Tools and Tips for DIY Screen Replacement
If you decide to tackle the installation yourself, here are some tools and tips to help you succeed:
Essential Tools
- Phillips-head screwdriver: For removing screws from your laptop’s casing.
- Plastic pry tool: To gently separate the screen bezel without scratching it.
- Anti-static wrist strap: Protects your laptop from static electricity during the replacement process.
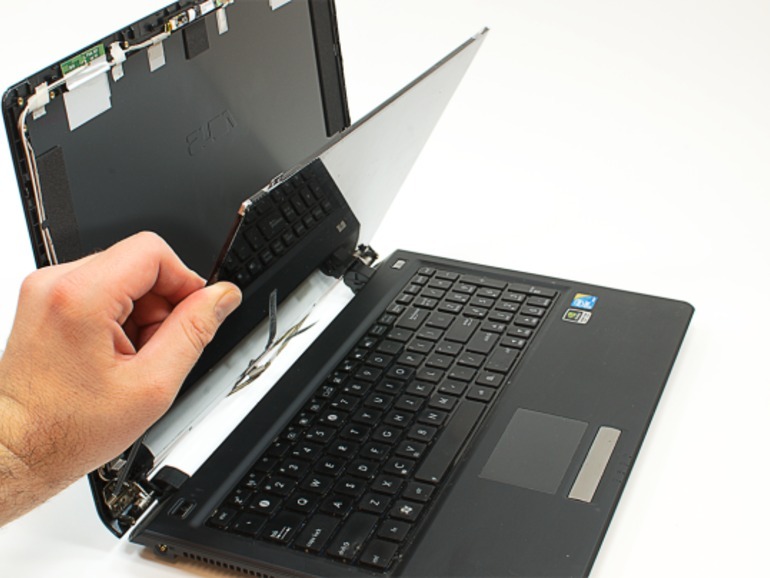
Step-by-Step Installation Guide
- Power off your laptop and disconnect the battery.
- Remove the screws holding the screen bezel in place.
- Gently pry the bezel away from the frame to expose the old screen.
- Disconnect the old screen’s cable and reconnect the new one.
- Secure the new screen in place and reassemble the bezel.
Conclusion
Identifying your laptop screen for replacement might seem daunting at first, but with the right approach, it’s entirely manageable. By following the steps outlined in this guide, you’ll be able to pinpoint the exact screen you need and make an informed decision about where to buy it and how to install it.
Remember, the key to a successful replacement lies in accuracy and preparation. Take your time, double-check your research, and don’t hesitate to seek professional help if needed. And hey, if all else fails, there’s always the trusty repair shop down the street.
Now it’s your turn! Have you ever replaced a laptop screen before? Share your experiences in the comments below, and don’t forget to bookmark this guide for future reference. Happy repairing!
Table of Contents
- Why Identifying Your Laptop Screen Matters
- Step-by-Step Guide to Identify Your Laptop Screen
- Common Challenges in Identifying Laptop Screens
- Where to Find Reliable Replacement Screens
- DIY vs Professional Installation
- Tools and Tips for DIY Screen Replacement
- Conclusion